Tuesday, November 13, 2012

E-Learning

E-LEARNING
  • Does multi-tasking give you a real or false sense of having accomplished something?
Multi-tasking gives me a real sense to a certain extent.Multi tasking enables me to complete the amount of work quicker than if I were to do it one by one.However, multi-tasking also gives me a false sense in terms of focus and attention.Once I multi-task, I will lose focus in a particular work and start to lose focus in other work too. In addition, it will only lead to confusion as it requires me to go back and fro from the work that I am doing.Each and everyone of us does things differently.As for me, I prefer to complete one work first and then start on another.This is to ensure that I will not be confuse and focus to complete a work with quality. 

  • Is learning 3D and design different from learning programming, or is all learning the same?Why?
Learning 3D and design are different from learning programming and other modules.To me, 3D and design are something that I really quite enjoy as compared to programming and other modules.Learning 3D, design and drawing can be fun and enjoyable as we work with models,sketches,etc. But programming and others are modules that can be very complicating and tedious at times.Even if I encountered difficulties in 3D and designing, I am willing to explore and resolve the matter myself. For other modules, most of the time I will seek help from the lecturers or my peers.
  • The article states that “Learning is actually a very complex operation for an individual”. Do you agree with this? Do you feel that you approach your learning in the best way – if yes, how, and if no, how can you change your work style?
I agree with the phrase "Learning is actually a very complex operation for an individual". The reason why is because,each of the individuals has to find the best styles for them to learn best. Therefore, the process of finding the best way in which an individual learn best is the challenge. For example, some learn best with diagrams,some learn best with notes and some, learn best with direct demonstrations. As for me, I still feel that I am not approaching my learning in the best way yet.I have to try various methods from now on to discover the best learning styles.Most of the time, I take down notes in my own words so that I will understand better. I still think that it is not enough for me to absorb the learning points as the noes that I've taken down are too dull and plain. I will try to improvise my learning style by taking down notes and draw diagrams with colours so that it motivates me to look at the notes more often and hence,study it.
  • What are your thoughts about the last paragraph in the extract?
I agree with the extract saying that communication and the ability to communicate well with other team members are very important.We need to have communication skills in order to be successful. If one has lack of communication skills, the message that he/she is trying to convey could not be passed on and hence, miscommunication will occur.
  • Should your lecturers also focus on your work attitude, or just leave you to sink or swim on your own? Why?
The lecturers should also focus on my work attitude instead of leaving me to sink or swim on my own.I thought so because work attitude is very important as it determine whether I am learning/understand what was taught or not. Each of the individuals learn best in different ways. But sometimes, I also think that it is good for us to be left on our own.Because we are matured enough to be independent and responsible for our own learning attitude.

Bucket Modelling

Bucket modelling


So far in this IN3D journey, this is the most difficult exercise for me,modelling a bucket.It is complicated at first.But after following the guide slowly, I finally completed it.In this exercise, an outline of a bucket was used, similarly with the race track exercise.There is a new tool that I came across while doing this exercise.It is called 'Soft Modification Tool'. It is used to scale objects from narrow to wide smoothly.Even though this exercise is very challenging,I managed to overcome it and made it look like the way I wanted.In addition, I added colours to the model of the bucket to make it look more attractive. 

Sunday, November 11, 2012

Ocean

Ocean


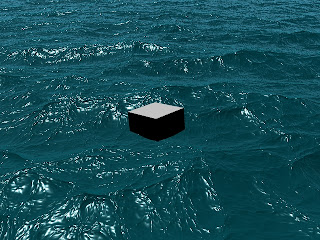
In this exercise,I use different status line "Dynamic". I learn how to create an ocean effect and animate it.I learnt how to texture the wave and add an effect as if the cube looks like a boat on the water,floating.


Saturday, November 10, 2012

Boolean?

What are Booleans?
In Maya a Boolean is an operation that is performed one two objects to create a single compound object. You can apply three different types of Boolean operations: Union, Difference and Intersection.

How do Booleans work?
Applying a Boolean is quite simple. You select both objects and go to Mesh->Booleans and select which Boolean operation you would like to perform. If you are unsure which operation is the right one, do not worry – You can always change the type of Boolean in the channel box later on (Assuming you have history turned on).
When applying a Boolean Maya takes into account the volume of the two selected objects and the space both objects might share. The easiest way to understand Booleans is to think of the operation as a Math Formula. The first selected object will be A, the second object will be B and the compound object after the operation will be C. So the formula goes like this: Object A (BOOLEAN OPERATION) Object B = Object C. This might seem confusing at first, but it will make a lot more sense once you have read the next section.

What are the different Boolean operations?

Union: A + B = C. Union will combine the volume of both objects into a single object. It almost works like
Mesh->Combine with the difference that Union will take out the shared space between object A and B.


Difference: A – B = C. Difference will subtract the volume of object B from object A. Note that Difference only works if both object share space in between them. You could also say that you are using object B to drill a hole into object A. The shared space will be the drilled hole and object B will disappear completely afterwards. Keep in mind that selection order is of vital importance when using the Difference operation: First selected object is A, second selected object is B. If you are unsure which object you selected first take a look at the colors of your edges. Object A should be highlighted white, object B should appear green (assuming that you haven’t changed you Color output).


Intersection: A % B = C. Intersection deletes both objects and leaves only their shared space. As the name of the operation implies object A and object B need to actually share space in between them – otherwise you will be left with no geometry after the operation has been performed.

Washing board modelling

WASHING BOARD MODELLING


In this exercise,I used the bevel tool and extrude tool to create the lines in between the washing board.Duplicating and aligning the shapes are used often in order to make it equally in scale.

Race track modelling

Race Track Modelling


Track outline

Straight track

Curve track

The race tracks were created with the guidance of the track outline as shown above.An outline can be created first before modelling it in Maya as it may be too complex to model it directly.With an outline, the polygon of the object can be created by using the 'Create Polygon Tool'.This allows the user to customize the polygon instead of using the polygon primitive shapes that are already available in Maya.I find the concept of having outline first very useful and convenient for the designers/modellers. The track was curved by changing the curvature from 0 to 1 in the bend1 section in channel box. If I want the tack to be straight instead of curve,I change it back form 1 to 0.

Phone wire modelling

Phone wire modelling

Stretched wire

Straight wire

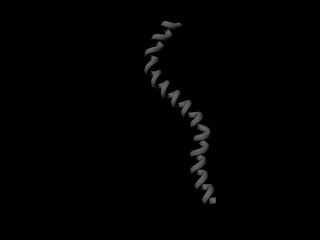
This was modelled using CV curve tool and NURB circle.This exercise requires a lot of scaling and moving. This object was not created by the primitive shape helix. It is because we want it to look more realistic when  it was stretched like how the real phone wire does.

Cardboard box Modelling

CARDBOARD BOX MODELLING


This model of a box.It was created by using the polygon shape cube.The vertex of this object was selected in order to make the middle of the box to look as if it is empty.Extrude and rotate function were used to to make the flaps of the box and scale tool to create the curves on the flaps to make it look as if it is used and old.

Toy train modelling

TOY TRAIN MODELLING


From what I learnt in the previous exercise such as bevel, I applied it here to model the toy train.This exercise is a little difficult for me as I have to model just by looking at a picture.There was no guide available for this toy train model.Therefore, I tried to apply the process and tools that I was taught before to this exercise such as bevelling, curving, duplicating and performing boolean.

Toy blocks modelling

TOY BLOCKS MODELLING


This is a model of toy block.This was created using basic polygon shapes such as cylinder,prism and cuboid.Also in this exercise, I learned how to use bevel.Bevel is a tool that can make the edges look smoother.Since toy blocks are usually meant for toddlers and kids, toys that they play have to be blunt and non-sharp.Apart from that, I learnt how to perform the boolean to make a gable block.

Gear modelling

GEAR MODELLING


This model was created using the basic polygon shape called pipe.I learnt how to make proper selection in this exercise.For this case, the face.Amendments were to be made only on the face of the object.Therefore,'face' were selected instead of the object. To create the teeth that protruded out of the pipe,I use the extrude tool.

Sunday, November 4, 2012

Revolve object!

REVOLVE

A revolve object is created by first drawing a curve in the front view. The curve is then rotated around one of the axis to form a Nurbs or Polygon object.

Examples of revolve objects include wine glasses, car tires, bottles, soup cans and kitchen pans.

Step One

In the front view draw a curve (Create>CV Curve Tool) to form the cross-section profile for your new object.
The profile should start and end at the Y axis.

Step Two
Select the curve and choose Surfaces > Revolve and include the options.

Step Three
In the options set the Axis Preset to Y, increase theSegments to 16 and choose Nurbs for the Output Geometry. Click Revolve to accept the settings.
 

Saturday, November 3, 2012

What is NURBS?

It is a Non-uniform rational basis spline (NURBS) is a mathematical model commonly used in computer graphics for generating and representing curves and surfaces which offers great flexibility and precision for handling both analytic and freeform shapes.

NURBS are used great on complex modelling such as gaming characters or object that has a large number of details.It is easier to adjust the forms and proportions as there are more accessible control points for modifications than polygon primitives
Example of a NURBS modelling

Friday, November 2, 2012

Bowl

Bowl modelling


This model of a bowl was created using a CV curve tool whereby I am allowed to make my own outline of half of the bowl.Next, to make it round and look like a real bowl,I use the revolve tool.This tool is very easy to use if i were to create an object that require a hollow fill.


Mushroom

Mushroom modelling


The mushrooms are created using NURB sphere. The differences between NURB polygons and primitive polygons are NURBs have more vertices and wireframes on the polygon where else primitive polygons has lesser wireframes as it is much more basic.NURBs polygons are mostly used for complex and more realistic object such as a character's face whereby it has more detail and dents. The mushroom are scaled to meet it's shape.